A worsted / aran crocheted rendition of a water lily pad floating in a pool of cool blue water. Easy and fast to make, it makes a bright and cheerful addition to any afghan, pillow, or anywhere you want a touch of whimsy. Adorn it with a water lily, or even a little amigurumi frog!
I designed this to go with another square (Reflected Dragonfly by Aurora Suominen). They look really cute together!
Instructions are below, or click here to download this pattern
Note: Pattern is for the square only.
Skill level: Easy
Size: 6”
Materials used for square shown (square only – see end of pattern for flower info)
Yarn, Worsted Weight-4 (Medium), 75-85 yards (69-78 m) total.
The pattern square pictured used:
Red Heart Super Soft, Grass Green
Caron Simply Soft, Blue Mint
Caron Simply Soft, Light Country Peach
Stitch markers
Yarn needle
Crochet Hook – Size F-5 (3.75 mm)
Yarn, Worsted Weight-4 (Medium), 75-85 yards (69-78 m) total.
The pattern square pictured used:
Red Heart Super Soft, Grass Green
Caron Simply Soft, Blue Mint
Caron Simply Soft, Light Country Peach
Stitch markers
Yarn needle
Crochet Hook – Size F-5 (3.75 mm)
Gauge: Using the specified yarn and hook size, and crocheting somewhat tightly, results in a 6” (15.24 cm) square. Lily pad is 5” (12.7 cm) across. If you use a heavier worsted yarn than the Simply Soft yarn recommended for the water and border, you may need to go down a hook size.
Abbreviations
beg begin(ning)
BLO back loop only
ch chain
dc double crochet
hdc half double crochet
lp(s) loop(s)
rnd(s) round(s)
sc single crochet
sc2tog single crochet two stitches together
sk skip
sl st(s) slip stitch(es)
st(s) stitch(es)
yo yarn over
V V-shaped slit in lily pad
beg begin(ning)
BLO back loop only
ch chain
dc double crochet
hdc half double crochet
lp(s) loop(s)
rnd(s) round(s)
sc single crochet
sc2tog single crochet two stitches together
sk skip
sl st(s) slip stitch(es)
st(s) stitch(es)
yo yarn over
V V-shaped slit in lily pad
Stitch Explanation
Magic ring (also known as magic circle and adjustable ring) – Tutorial at http://www.crochetspot.com/how-to-crochet-the-magic-adjustable-ring
sc2tog (sc 2 sts together) – (Insert hook in next st and draw up a loop) twice, yarn over and draw through all 3 loops on hook - 1 st decreased.
Magic ring (also known as magic circle and adjustable ring) – Tutorial at http://www.crochetspot.com/how-to-crochet-the-magic-adjustable-ring
sc2tog (sc 2 sts together) – (Insert hook in next st and draw up a loop) twice, yarn over and draw through all 3 loops on hook - 1 st decreased.
Symbols
( ) and/or [ ] — Work enclosed instructions as many times as specified by the number immediately following, or, work all enclosed instructions in the stitch or space indicated, or, contains explanatory remarks.
( ) and/or [ ] — Work enclosed instructions as many times as specified by the number immediately following, or, work all enclosed instructions in the stitch or space indicated, or, contains explanatory remarks.
Tip
Short pieces of yarn, safety pins, or coated paper clips make good stitch markers.
Short pieces of yarn, safety pins, or coated paper clips make good stitch markers.
PATTERN
American terms are used throughout.
Lily pad
Note: Beg ch 2 does not count as a st.
With green, make magic ring.
Rnd 1: In magic ring, ch 2, dc x 12, sl st to 1st dc to join. (12 st)
Rnd 2: Ch 2, 2 dc in each st around. Do not join. (24 st)
Rnd 3: Ch 2, turn, dc in same st, (2 dc in next st, dc in next) 11 times, 2 dc in last. (36 st)
Rnd 4: Ch 2, turn, dc in same st, dc in next st, (2 dc in next st, dc in next 2) 11 times, 2 dc in last. (48 st)
Rnd 5: Ch 2, dc in same st (place marker in dc), dc in next 2, (2 dc in next st, dc in next 3) 11 times, 2 dc in last. Do not fasten off. (60 st)
Edge the slit in lily pad:
Note: Hereafter, slit in lily pad will be referred to as “V”
Ch 1, work 8 sc evenly down side of V (place marker in 1st sc), sl st in bottom of V, work 8 sc back up the other side (place marker in last sc), sl st in top of marked 1st dc of Rnd 5 to join (leave marker in st). (16 sc in V + bottom sl st)
Fasten off green. Mark as right side.
Water
With blue, beg by filling in V:
Work in BLO unless otherwise instructed.
Right side facing, join blue with sl st in marked 1st sc of V, ch 2, dc in same st (leave marker in st), dc in next, hdc next 2, sc next 2, sl st in next, sl st the next 2 sc together (the 8th and 9th scs in V), ch 1, TURN, working in both lps of blue, sk sl st, sl st in next sl st, sc in next st, hdc in next 2, dc next 3, turn. Do not fasten off.
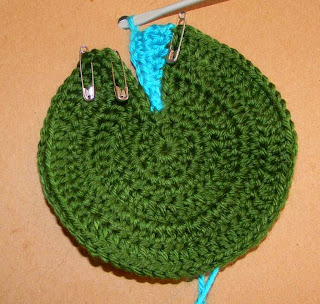
This is what your lily pad should look like so far:
Don't worry about the unattached part of the water in the V. That will be taken care of later.
Beg working water around lily pad:
Note: When instructed, work corner as follows: (2 dc, ch 2, 2 dc) in next st
Rnd 1: Work entire rnd in BLO. (Sc2tog the last marked st in the V and the marked 1st dc of Rnd 5, remove markers and place marker in sc made by sc2tog), hdc in next 2 st, dc in next 2, work corner, (dc in next 2 st, hdc in next 2, sc in next 7, hdc in next 2, dc in next 2, work corner) 3 times, dc in next 2 st, hdc in next 2, sc in next 2, (sc2tog next st and marked st in V, remove marker), work 4 sc evenly across ends of rows in V, sk marked st, sl st in next st to join, remove marker. (19 st each side + 4 ch-2 sp)
Rnd 2: Work in both lps as usual. Ch 1, sc in same st, hdc in next, dc in next 4, work corner, (dc in next 4 st, hdc in next, sc in next 9, hdc in next, dc in next 4, work corner) 3 times, dc in next 4 st, hdc in next, sc in next 8, sl st in 1st sc to join. (23 each side + 4 ch-2 sp)
Fasten off, leaving a long yarn tail.
Sew together the open spot between the water and lily pad in V:
Thread needle with yarn tail. Run through st to unattached part of water. Stitch together in BLO of green, and both lps of blue.
Border
- Measure square. Make border with either sc, hdc, or dc, depending upon size needed to achieve 6”.
- When instructed, work corner as (2 st, ch 2, 2 st), where st = the st decided upon for square size.
Fasten off. Weave in all ends.
~~~~~~~~~~~~~~~~~~~~~
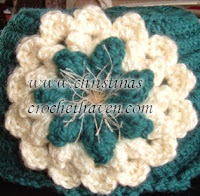
FLOWER
~~~~~~~~~~~~~~~~~~~~~
Please enjoy this pattern and feel free to sell any items you make using it.
I just ask that design credit for the square be linked back to me,
and credit for the flower (if used) to be linked back to Christina Budd.
~~~~~~~~~~~~~~~~~~~~~
© 2014, 2015 Tamara Adams, http://www.ravelry.com/designers/tamara-adams
I just ask that design credit for the square be linked back to me,
and credit for the flower (if used) to be linked back to Christina Budd.
~~~~~~~~~~~~~~~~~~~~~
© 2014, 2015 Tamara Adams, http://www.ravelry.com/designers/tamara-adams


Your thoughts are always appreciated!