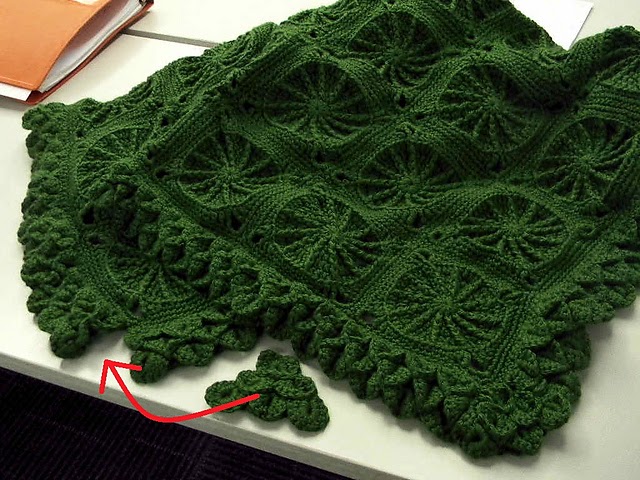
The crocodile stitch is also known as "Scale" stitch, "Crocodile Teeth" stitch, or "Shingle" stitch.
This is not another crocodile stitch how-to.
It assumes you already know the crocodile stitch.
Rather, this is a how-to on how to size, and attach a croc
stitch border to something; in this case, an afghan.
There are many video and photo tutorials to do the stitch. This is the one I used when I first learned it: Crochet Crocodile Stitch the Easy Way by lostandfoundlane.com
There are many video and photo tutorials to do the stitch. This is the one I used when I first learned it: Crochet Crocodile Stitch the Easy Way by lostandfoundlane.com
Since the crocodile stitch pattern develops from outer tips to upper edges, you can’t attach it directly to the afghan (otherwise the “scales” would be upside down). This means making a separate border to attach to whatever it's going on.
This tutorial refers specifically to an afghan (pictured below) I made for my first grandson, BUT I guess it applies to about anything else, when it comes right down to it.
I was too new to the stitch to know how to work in angled sides so that they would make mitered corners to connect together, so I made straight strips first, then made corners separately and attached them.
 |
| Click to view pattern and yarn information |
But, the following method will work the angles in,
so you don't have to do the corners separately.
First, prepare the afghan: If not done already, work sc all around the afghan itself, working 3 sc in each corner sc. Count number of st on length and number of st on width. Include center sc of corners in count. For example, if the sc count on one side is 130, add 2 - one for each center corner sc - for a total of 132. (Each side will count both of it's center corner sc).
To figure the length of the beginning chain:
Use the count of sc st from a completed afghan side, and increase (if necessary) to be a multiple of 5. For example, if a side of your afghan is 132 sc, then your beginning figure will be 135. (If the side of your afghan is 135 sc then it just stays 135 because it's a multiple of 5).
Now, for each row of crocodile scales that you want, add 10 st. For example, if you want 3 rows of scales (as shown in the picture), you will add 10 st x 3 rows for a total of 30 st. Add this to your beginning figure of 135. In our example, then, your beg ch would be 165.
Abbreviations
sc = single crochet
dc = double crochet
ch = chain
beg ch = beginning chain
lps = loops
beg = beginning
st = stitch
Ch the # needed (see To figure the length of the beginning chain:, above)
1st "ladder" row: Work beg "ladder" in ch, as usual for the crocodile st.
2nd row (1st "scale" row): Work 1st row of croc st scales, as usual for the crocodile st.
3rd "ladder" row: Work "ladder" as follows: You want to decrease by one scale on each side. Use ch st to skip over to spot where your first croc scale "ladder rungs" will start, and stop short by enough rungs at end to make the decrease on that side.
4th row (2nd "scale" row): Work croc scales across. You should have 2 less scales than previous scale row (one less from each side).
5th "ladder" row: Repeat 3rd "ladder" row.
6th row (3rd and last "scale" row): Work croc scales across. You should have 2 less scales than previous scale row (one less from each side).
7th row (edging): Work sc across: 5 sc evenly across each scale (put one of them in the center of the scale) to the end. This row makes it easier to attach, and “shapes up” the croc stitches.
You should end up with the number of sc you need to attach the border to the afghan. If it's a few st off it's okay - you can work an increase or decrease when attaching the border by evenly spacing your increase or decrease. It will not show.
Place border and afghan right sides together. Using a yarn needle, whip-stitch sc of border and afghan together, working through all top lps of the sc's (of both the border and the afghan).
You'll see the scales from the mitered corners need to be connected.
Using a yarn needle, connect the corner borders together.

This is brilliant! YOU are brilliant! Thank you for sharing!!
ReplyDeleteThank you, I just hope it makes sense to somebody LOL
Delete